Perhaps you sent someone else the wrong email out of the blue. Or, obviously, maybe you sent a work email but neglected to include a file that your colleagues require.
If you use Outlook, you’re in favor if you need the means to restore it. It is due to the fact that Microsoft’s email application contains a built-in remedy for instances like these: the capability of how to recall an email in Outlook. You need to know that a receiver may not see an incomplete, irate, or otherwise problematic email you send if you use an email recall. When you want to recall an email in Outlook, follow the steps below.
Continue beyond the recall guidelines to get a lesson on how to do that for. If you also wish to know how else to delay your emails in Outlook (to avoid unintentionally mailing out similar emails in the long term), read here.
Table of Contents
You Might Also Like


How to Recall an Email in Outlook
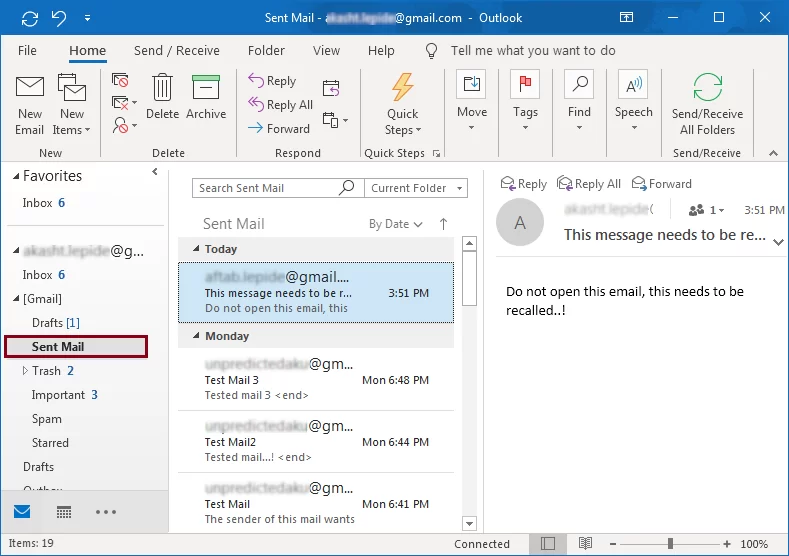
Step 1: Locate the email you wish to recall in your Sent Documents file. It ought to be at or around the top of your list. You need to know that before continuing, you must double-click on this email to view it completely.
Step 2: To activate the Notification item on the menu, click on it. Then, go to the Moving section and select the More option which is represented by a word and an envelope.
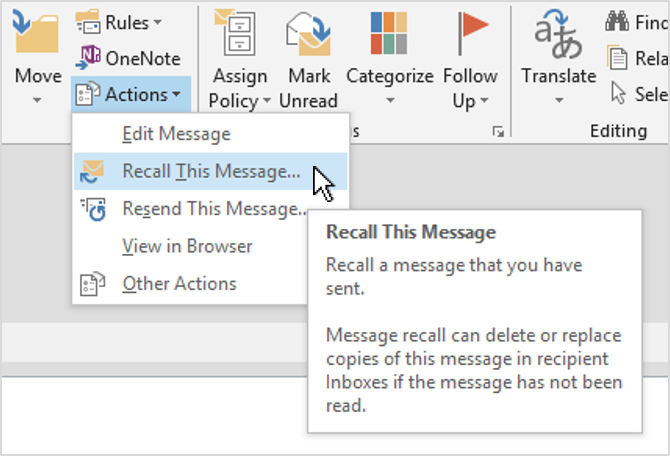
Step 3: From the drop-down menu, select Recall This Email.
Step 4: Conduct the following when your application uses the ribbon’s streamlined design: Recall Your Email can be done by selecting the Messages box, the triple dots symbol, Actions, and finally, Recall That Email.
Step 5: Your display shows a popup message. Remove Unwatched Copies of This Email or Erase Unread Copy and Substitute With a New Email are your two choices here. You can also choose to have Outlook send you a notification if the procedure is successful or unsuccessful. To begin, pick your choice(s) and press the OK key. Well done if you eliminated the message! Proceed if you wish to change it.
Step 6: Outlook shows a second screen so that you can edit the text if you decide to generate an alternative. Outlook recalls your last email and displays a notification as you begin a new one. Once you’re complete editing the email, simply press the Send button.
Your old email will not really precisely go if you compose a recall text. The recipient may be required to read the recall email the first one in order for the initial communication to remove. It is the reason you should use a word like “emergency” or anything comparable in the subject of the recall mail to ensure that it is viewed before the offending mail. For an even more comprehensive explanation, read on.
Additionally, according to Windows, in some situations, the receiver might be informed when remembered emails are removed from their inbox. Therefore, take into consideration that even if the receiver can’t see an unpleasant or poorly written email that was delivered to them, they could still be aware of it.
Alternatives Method for How to Recall an Email in Outlook
Solution 1: Compose an email of apology. It is most likely the simplest way to fix the problem, except double-check to ensure your emails have been sent to the correct recipients. Focus on saving effort and time by admitting your error and expressing regret if you mistakenly sent a message to the incorrect individual or group of individuals, and it wasn’t very shocking. A genuine apology usually gets along well with the receivers and might even foster trust. You can all depart after that.
Solution 2: Of course, postpone sending your emails, so they don’t go out immediately. Consider postponing your emails if you frequently respond to them, exchange sensitive information, or make mistakes easily. You know that if you adhere to these straightforward procedures, you may quickly set up how to recall an email in Outlook:
Step 1: Click Folder in Outlook’s top corner.
Step 2: After a bit of scrolling down, select Configure Rules & Alerts.
Step 3: A popup titled “Rules and Alerts” will appear on your desktop. Choose the “New Rule” option from this point on.
Step 4:Additional a popup window will open in step four. Choose Set Restriction on Emails I Send to proceed. As you’ll see, this is mentioned after Begin From a Blank Rule. Click the Continue button to proceed.
Step 5: Select Next to proceed without thinking about any other items on the criteria list. A verification window will then show up. To verify, click Yes.
Step 6: Choose Defer Deliveries By a Specific Number of Minutes in step 6 to continue. A Number of URLs should be selected. You’ll be asked to enter your chosen time on a popup screen that will display. Select the OK button after entering the desired number (the maximum is 2 hours). After completing all of the stuff, click Continue.
Step 7: Choose the alternatives you want to use if there are exceptions. Next, go by clicking the Next button.
Step 8: Provide your rule a name and, if it’s enabled, select the Set On This Rules checkbox. Click the Confirm button to complete.
Conclusion
All of this is meant to imply that you shouldn’t just rely on Outlook, which would save you if you mistakenly send a crucial email to the wrong recipient or say anything you later wish you hadn’t told for work-related reasons. It is essential to know that the best way to avoid getting into that predicament is never to put yourself in that circumstance first.
Even though you now understand how to recall an email in Outlook, constantly read your emails, verify files, and double-check contacts before pressing the send button. The internet isn’t said to exist eternally for anything.


![Is Tokyo Ghoul on Netflix? [How to Watch Online]](https://avctv.com/wp-content/uploads/2022/08/AAAABct1DaUzhEt4JeJFeDrmaE_4CGAu39fBN6poMx10hAlWlMRjkkAw84hjmuujWTy2wFC7_Pjnujec-_PqT1GCnnMFMJ15S04baJn1b0WvvbG6hrSNb31_GS4--120x86.jpg)


